: m a n u s i a :
Hidup ni bukan kita seorang dalam dunia.. aku sendiri, hari2x jumpa dengan ramai orang.. orang pulak ada macam2x jenis.. ada yang pentingkan diri sendiri, ada yang x boleh kalah, ada yang x boleh tengok orang lain senang.. orang macam ni, bagi aku.. bagi je lah apa dia nak.. diamkan diri, mungkin cara yang terbaik. cakap pun x guna. MUNGKIN kalau tak ada orang macam ni dalam hidup kita ni.. hidup kita jadi bosan.. hari2x kita senang, tak ada masalah.. tak ada masalah nak fikir.. mungkin lah kan.. aku sendiri pun tak sempurna.. dia juga ada pandangan dia dekat orang macam aku ni. kan ?
Clash Of The Bands - SkaCombat
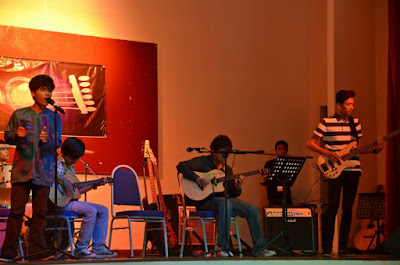
Gambar ni time kitorang join Clash Of The Bands(aku yg baju hijau tu..hahha XD) dekat UMP.
Kitorang memang langsung x expect apa2x.. dapat no.2 pulak kan.. Alhamdulillah. :D
Kitorang memang langsung x expect apa2x.. dapat no.2 pulak kan.. Alhamdulillah. :D
 |
| Mierul ni entah mimpi apa pakai baju melayu pun aku x tahu kenapa. |
 |
| Tu dia guitar solo dengan basist. |
 |
| Time kena komen dengan juri (dah macam reality show pulak *seriously nervous) boleh kena puji pulak.. dye cakap apa ea.. ntahla.. tapi.. puji pujian la. :D |
 |
| Tak sangka. second prize. Sijil + Hamper + RM300. waaa.. XD |
 |
| SkaCombat : Dari kiri Izzat (Bassist), Aku (Rhythm), Mierul (Vocal), Bidot (Solo + Vocal), Sani (Drummer) |
- Canon (in C) instrumental.
- Drama Band - Babak Pertama.
- OAG - PerMySuri.
- GerhanaSkaCinta - Senyuman Ragamu.
*bukan niat nak berlagak, bnda mcm ni bukan jadi hari2x dekat aku.. XD
Adobe Illustrator : Tracing A Photo
1.
Place a photoFirst place a photo in Layer 1 by File > Place or Copy & Paste from clip board. Double click on Layer 1 to change the Layer Options. Set Dim Images to: 30% and lock layer.
 2.
2.
Make a new layer (Layer 2). Hold down Ctrl key and click on the eye icon of Layer 2 to view Layer 2 in Outline mode. Use the Pen Tool and start tracing the basic features of the girl. While you are tracing, there are couple shortcut keys you should know in order to work more faster.
These shortcuts are:- Ctrl+[ = Send Backward (This will send object back 1 step)
- Ctrl+] = Bring Forward (This will bring object front 1 step)
- Ctrl+Shift+[= Send to Back (This will send object all the way to the back)
- Ctrl+Shift+]= Bring to Front (This will bring object all the way to the front)
- Ctrl+F = Paste in Front (This will paste object in front with same position)
 3.
3.
Draw a new path as shown (top). Then Copy the base path of the face and Paste in Front. Select the copied base path and the new path, open your Pathfinder, Alt-click onIntersect shape areas.
Use the same technique from previous step and make all shadow paths for the overall illustration. You don’t have to get into the details yet, one simple shadow path of each part is good enough (ie. eye, lips, shirt, body, etc). Remember to use Ctrl+C for copy; and Ctrl+Fto paste object in front. Trust me, this will save you a lot of time!
4.Now fill in the base color for the face, eye, lips, and eyebrow.

5.Fill the shadow path of the face with a Gradient (white-skin tone) and select Multiply for Blending Mode.
Select the other shadow paths and use the Eyedropper Tool to copy the gradient fill of the main shadow path.

For the lip and eye shadow, use the Eyedropper to copy the base fill and select Multiply Blending Mode.
6.Use the same technique, copy the gradient fill for the body. Note you might to adjust the gradient of each shadow path to blend in with the overall illustration.
 7.
7.
Pretty much the same, fill 1 path with the gradient, then use the Eyedropper Tool to copy the fill.
8.Same technique as the previous steps.
 9.
9.
Fill the skirt with a blue gradient, then use the Eyedropper Tool to copy the fill for the shadow.
10.Now you can add more details to the hair. Make shadow effect by adding Multiply paths. Add some highlights by using lighter gradient color. If you want, you can add more details to the clothes, lips, or add a cool tattoo on her body.
After you get used to this tracing technique, you can basically trace anything!Start tracingMake shadowFill in base colorShadow gradientBodyHairShirtSkirtHair details
Final
Subscribe to:
Posts (Atom)


